Tattoo transfer paper is essential for creating clean and precise stencils. It helps artists outline their designs before inking. Many professionals use thermal copiers to transfer designs quickly, but these machines are expensive and not always accessible.
Luckily, there are reliable alternatives! In this guide, you’ll learn how to use tattoo transfer paper without a thermal copier. We’ll explore manual tracing, hectograph transfer methods, and skin preparation techniques to ensure a perfect stencil every time.
Understanding Tattoo Transfer Paper
Tattoo transfer paper is a crucial tool for tattoo artists. It allows them to accurately transfer their designs onto the client's skin. This special paper creates a stencil that serves as a guide during the tattooing process.
What Is Tattoo Transfer Paper?
Tattoo transfer paper consists of multiple layers, each serving a specific purpose:
The top layer is where the artist draws or prints the design.
The middle layer is a protective sheet, often made of tissue paper.
The bottom layer is carbon paper, which transfers the design onto the skin.
These layers work together to create a crisp, precise stencil. It ensures the tattoo artist can follow the lines and details of the original design accurately.
Types of Tattoo Transfer Paper
Choosing the right transfer paper depends on technique and equipment. There are two main types:
Hectograph (Hand-Drawn) Transfer Paper
Used for manual tracing without machines.
Contains three layers: master sheet, tissue layer, and carbon sheet.
Best for small, detailed designs requiring freehand adjustments.
Works with thermal copiers but can be used manually.
Has four layers: master sheet, tissue separator, carbon layer, and yellow backing.
Produces sharp, professional-grade stencils with high accuracy.
How to Choose the Right Transfer Paper
Picking the right transfer paper depends on skin type and the method used. Consider:
| Feature | Hectograph Transfer Paper | Thermal Transfer Paper |
| Best for | Hand-traced designs | Manual & machine use |
| Layers | Three | Four |
| Ease of Use | Simple, requires tracing | Produces sharper lines |
| Stencil Quality | Good for freehand | Cleaner and more defined |
For hand-drawn stencils, hectograph paper offers flexibility. Thermal paper delivers better precision when used manually.
Tools and Materials Needed for Manual Stencil Transfer
Creating a clean and precise tattoo stencil without a thermal copier requires the right tools. Each item ensures smooth tracing, accurate transfers, and long-lasting stencils.
Essential Materials
| Item | Purpose |
| Tattoo Transfer Paper | Transfers the design onto the skin. |
| Pen or Stylus | Traces the design for a clear stencil. |
| Scissors | Cuts the stencil for precise placement. |
| Stencil Solution | Helps the design adhere to the skin. |
| Tracing Surface | Provides a stable base for accurate tracing. |
| Printed/Hand-Drawn Design | Ensures a clear reference for stencil creation. |
| Skin Preparation Supplies | Cleans the area for better stencil adhesion. |
1. Tattoo Transfer Paper
Two types work for manual stenciling:
Hectograph Transfer Paper – Best for freehand tracing. It uses pressure to imprint the design onto carbon layers.
Thermographic Transfer Paper – Typically used in thermal copiers but can also be traced manually. Produces sharper stencils.
2. Pen or Stylus
A quality pen ensures precise lines during tracing. Options include:
Ballpoint Pen – Provides smooth ink flow.
Stencil Pen – Designed for fine detailing.
Pencil – Suitable for softer outlines before finalizing the stencil.
3. Scissors
Cutting the stencil precisely ensures easy placement. Sharp, small scissors work best for fine details.
4. Stencil Solution
This adhesive solution secures the design onto the skin. Choices include:
5. Smooth Tracing Surface
A flat, firm surface prevents paper movement, ensuring even pressure during tracing. A clipboard or a metal table works well.
6. Printed or Hand-Drawn Design
Clear, bold designs transfer better. If drawing by hand, use dark lines to enhance visibility.
7. Skin Preparation Supplies
A clean surface helps the stencil stick properly. Essential items include:
Alcohol Wipes – Removes oil and debris.
Soap & Water – Cleanses the skin before applying the stencil.
Paper Towels – Dries the area and removes excess stencil solution.
With these tools, artists can create crisp, professional stencils—no thermal copier needed.

Methods for Using Tattoo Transfer Paper Without a Thermal Copier
Tattoo artists without a thermal copier can still achieve clean and precise stencils. Several manual methods work effectively for transferring designs onto the skin. Below are three proven techniques for creating high-quality tattoo stencils.
Method 1: Hand-Tracing with Hectograph Transfer Paper
Hectograph transfer paper is designed specifically for manual tracing. Here's a step-by-step guide:
Prepare the transfer paper: Place the hectograph paper on a flat surface, carbon side up.
Place the design on top of the transfer paper: Position your tattoo design over the carbon paper, securing it with tape to prevent shifting.
Trace over the design with a ballpoint pen or stylus: Use firm, even pressure to trace the entire design. This transfers the carbon onto the back of your design paper.
Peel off the top layer to reveal the stencil: Carefully separate the design paper from the carbon paper. The design should now be visible on the back of the paper.
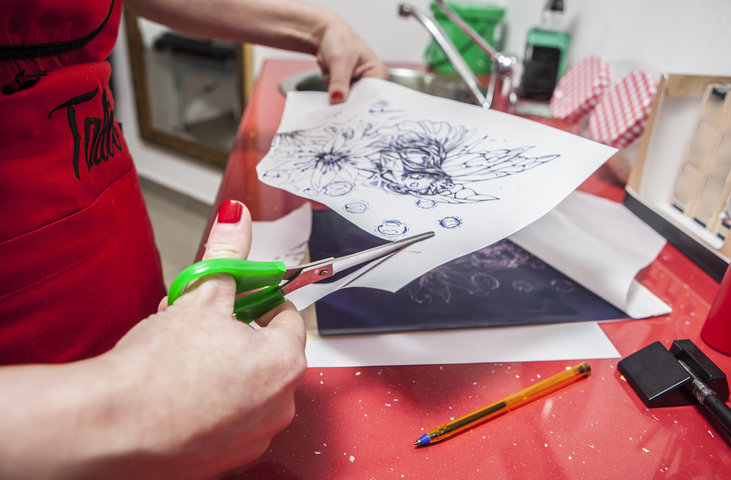
Cut out the stencil and prepare for skin application: Trim around the design, leaving a small border. The stencil is now ready to be transferred onto the client's skin.
Pros:
Simple and straightforward process
Requires minimal supplies
Ideal for smaller, less detailed designs
Cons:
Method 2: Using Thermographic Transfer Paper by Hand
Although thermographic transfer paper is intended for use with a thermal copier, it can also be used manually.
Understanding the layers of thermographic paper: Thermographic paper consists of a white transfer sheet, a protective tissue layer, and a carbon sheet. For manual tracing, you'll only need the white transfer sheet and carbon sheet.
Step-by-step process of tracing onto thermal transfer paper without a copier:
Remove the protective tissue layer and carbon sheet from the transfer paper.
Place your design on a flat surface, then position the carbon sheet on top, followed by the white transfer sheet.
Trace over the design using a ballpoint pen or stylus, applying firm pressure.
Carefully peel away the white transfer sheet to reveal the stencil on its surface.
How to apply the design to the skin: The stencil can now be applied to the client's skin using a standard stencil transfer solution or gel. Press the stencil firmly onto the skin, wait a few seconds, then carefully peel it away to leave the design in place.
Pros:
Produces crisp, detailed stencils
Utilizes supplies many tattoo artists already have on hand
Compatible with manual tracing
High contrast on skin
Cons:
Requires separating and reassembling layers of the transfer paper
May be more time-consuming than using a thermal copier
More fragile than hectograph paper
Method 3: Creating Digital Tattoo Stencils for Manual Transfer
With the rise of digital art tools, many tattoo artists now design their tattoos using software like ProCreate or Photoshop. These digital designs can be printed and manually transferred onto tattoo transfer paper.
Using digital tools like ProCreate or Photoshop to refine designs: Create a high-contrast, black-and-white version of your tattoo design using your preferred digital art software. Ensure the lines are crisp and well-defined.
Printing a high-contrast stencil for tracing onto transfer paper: Print the design onto regular paper using a high-quality printer. Make sure the ink is dark and the paper is smooth to facilitate tracing.
Best practices for getting a clean and sharp stencil:
Use a lightbox or a bright window to make tracing easier and more accurate.
Secure the design and transfer paper with tape to prevent shifting.
Take your time and trace carefully, ensuring all lines are transferred.
Preparing the Skin for Tattoo Stencil Application
Proper skin preparation ensures a crisp, long-lasting stencil. Without it, the stencil may blur, fade, or rub off before tattooing begins. Clean, dry skin improves adhesion, making the design clearer and more stable.
Why Proper Skin Preparation Is Important
A stencil transfers best on smooth, oil-free skin. Residual dirt, oils, or moisture can cause the stencil to smudge or lift. Proper preparation:
Prevents stencil distortion during tattooing.
Reduces the risk of infection by removing bacteria.
Enhances stencil longevity for detailed work.
Cleaning and Drying the Skin Before Application
A clean surface helps the stencil adhere evenly. Follow these steps for proper cleansing:
Wash with Antibacterial Soap – Removes dirt, sweat, and oil.
Dry the Area Completely – Use a paper towel, avoiding cloth towels that may leave lint.
Wipe with Alcohol – Kills bacteria and eliminates oil for a smooth surface.
| Step | Purpose |
| Wash with soap | Removes surface oils and debris. |
| Dry thoroughly | Prevents moisture from disrupting adhesion. |
| Apply alcohol wipe | Ensures a sterile, oil-free surface. |
Choosing the Right Stencil Solution for Adhesion
The right stencil solution keeps the design sharp. Artists use:
Tattoo Stencil Lotions – Designed for professional use, ensuring smudge-proof transfers.
Roll-On Deodorant – A budget-friendly alternative that helps the stencil stick.
Apply a thin, even layer to avoid excess moisture, which can blur the stencil.
Tips for Ensuring a Smudge-Free Stencil Transfer
Let the stencil dry 5-10 minutes before touching.
Avoid excess solution—too much can cause ink bleeding.
Use a firm, even press when applying the stencil.
If errors occur, remove the stencil with alcohol and restart.

Transferring the Tattoo Stencil to the Skin
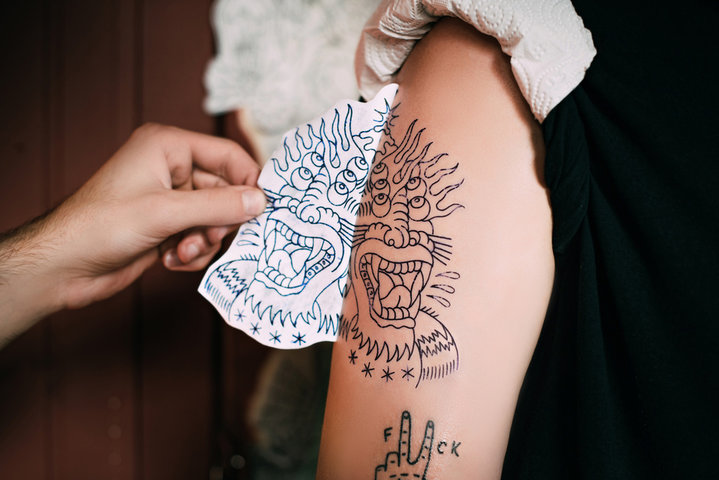
A properly applied stencil ensures clean, precise tattooing. Smudging or misalignment can cause mistakes. Following the correct steps prevents errors and keeps the design sharp.
Step-by-Step Guide to Placing and Pressing the Stencil
Position the Stencil – Align it carefully to match the intended placement.
Press Firmly – Smooth it over the skin, removing air bubbles.
Hold in Place – Apply even pressure for proper adhesion.
Peel Off Slowly – Lift one corner and remove gently.
Check the Stencil – Ensure all lines have transferred cleanly.
| Step | Key Action |
| Align the stencil | Position it correctly before pressing. |
| Press firmly | Remove wrinkles or air pockets. |
| Hold for 30 seconds | Helps ink transfer fully. |
| Remove carefully | Prevents smudging or tearing. |
How Long to Leave the Stencil Before Removing the Transfer Paper
Wait 30–60 seconds after pressing the stencil before peeling it off. This allows the ink to set. Removing it too soon may result in uneven transfers.
Checking for Clarity and Completeness of the Transferred Design
After lifting the paper, inspect the stencil:
All lines should be visible and sharp.
No missing or broken sections.
No smudging or excessive ink bleeding.
If any part looks faint or incomplete, reinforce the lines using a sterile marker.
Adjusting and Fixing Mistakes Before Tattooing Begins
If the stencil is misaligned or blurry, remove it completely:
Use alcohol wipes to erase the design.
Let the skin dry fully before reapplying.
Repeat the application process with careful alignment.
Troubleshooting Common Issues
Tattoo stencils must be crisp, clear, and well-adhered to the skin. Smudging, incomplete transfers, or poor adhesion can affect tattoo accuracy. Below are solutions to common stencil transfer problems.
What to Do If the Stencil Doesn’t Transfer Properly
If the stencil appears faint, uneven, or smudged, assess the cause:
Too much stencil solution – Excess moisture can blur the lines.
Dirty or oily skin – Residue prevents proper adhesion.
Uneven pressure – Inconsistent pressing leads to patchy transfers.
Quick Fix: Remove the stencil, clean the skin, let it dry, then reapply using even pressure.
How to Remove and Reapply a Stencil Without Damaging the Skin
If the stencil is misaligned or blurry, follow these steps:
Use alcohol wipes – Gently rub to remove all stencil ink.
Cleanse with soap and water – Removes excess residue.
Pat dry completely – Avoid moisture before reapplying.
Apply a fresh stencil – Ensure proper alignment and firm pressure.
| Mistake | Solution |
| Smudged stencil | Reduce stencil solution, apply evenly |
| Stencil misaligned | Remove with alcohol, reapply properly |
| Faint lines | Use firm pressure when pressing down |
Fixing Blurry or Incomplete Stencil Transfers
If the stencil blurs or fades, check these factors:
Stencil paper shifted during transfer – Hold it steady while pressing.
Too much moisture – Excess solution dilutes the ink.
Uneven skin texture – Stretch the skin slightly for smoother application.
Fix: If only a small section is incomplete, carefully redraw with a fine-tip stencil marker. If the entire stencil is unclear, remove and reapply.
Ensuring Proper Stencil Adherence for Longer Tattoo Sessions
A fading stencil affects accuracy during long tattooing sessions. To extend its lifespan:
Use the right stencil solution – Professional stencil lotions last longer than deodorant.
Allow full drying time – At least 10 minutes before tattooing.
Avoid excessive wiping – Blot sweat instead of rubbing.

FAQs About Using Tattoo Transfer Paper Without a Thermal Copier
Can I Use Regular Carbon Paper for Tattoo Stencils?
No, regular carbon paper is not suitable. Tattoo transfer paper is specially designed for skin application, ensuring ink adheres safely. Carbon paper lacks the right ink formula and can fade, smudge, or irritate the skin. Always use hectograph or thermographic tattoo transfer paper for best results.
What’s the Difference Between Freehand Stencils and Transfer Paper Stencils?
| Feature | Freehand Stencil | Transfer Paper Stencil |
| Method | Drawn directly on skin | Pre-traced on paper |
| Precision | Risk of inconsistencies | Sharp, accurate lines |
| Time Efficiency | Time-consuming | Faster application |
| Use Case | Small tattoos or touch-ups | Complex, detailed designs |
Transfer paper provides cleaner, more professional results, while freehand stencils work better for quick sketches or adjustments on the fly.
How Long Does a Hand-Traced Stencil Last on the Skin?
A properly applied stencil can last several hours to a full tattoo session. Longevity depends on:
Skin preparation – Clean, dry skin improves adhesion.
Stencil solution – Professional stencil lotions increase durability.
Tattooing technique – Avoid excessive wiping to maintain clarity.
For longer sessions, artists blot sweat instead of rubbing, preserving stencil details.
Can I Use Tattoo Transfer Paper with an Inkjet or Laser Printer?
No, tattoo transfer paper is not compatible with standard inkjet or laser printers. The ink won’t adhere properly, leading to faint or unusable stencils.
For digital stencils, print designs on regular paper, then trace manually onto transfer paper. Alternatively, invest in a tattoo stencil printer designed for professional use.
What’s the Best Stencil Solution to Use for Long-Lasting Results?
The right stencil solution improves adhesion and prevents smudging. Recommended options:
| Stencil Solution | Benefits |
| Tattoo Stencil Lotion | Long-lasting, professional-grade, smudge-resistant |
| Roll-On Deodorant | Budget-friendly, moderate adhesion |
| Green Soap & Alcohol Mix | Cleans and preps skin but doesn’t enhance longevity |
For best results, apply a thin, even layer and let it fully dry before placing the stencil.
Conclusion
Tattoo transfer paper helps artists create precise, professional stencils without needing a thermal copier. Manual tracing offers flexibility and control over designs.
Three main methods work: hectograph transfer paper, thermographic tracing, and digital stencil creation. Skin preparation is essential for a smudge-free, long-lasting stencil.
Choosing the right stencil solution improves clarity and durability during long tattoo sessions. A proper application process ensures sharp, detailed transfers every time.
Mastering manual stencil techniques takes practice and patience. Experimenting with different methods helps artists refine their skills and achieve professional results.


